


สรุปข่าว
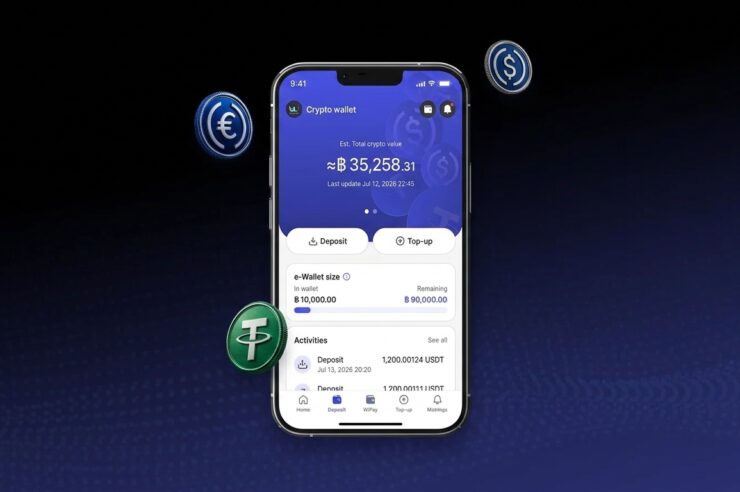
- WORPT เป็นแอปกระเป๋าเงินสำหรับนักท่องเที่ยวต่างชาติ ฝาก USDT หรือ USDC แล้วแปลงเป็นเงินบาท จ่ายผ่าน Thai QR หรือบัตร Visa Prepaid ภายใต้ TouristDigiPay Regulatory Sandbox
- คู่มือนี้รวมทุกขั้นตอน ตั้งแต่ยืนยันตัวตนด้วยหนังสือเดินทาง เชื่อมต่อกระเป๋า ฝาก เติมเงินบาท จ่ายเงิน ไปจนถึงถอนและเปิดใช้งานบัตร พร้อมภาพหน้าจอจากคู่มือทางการ
- ข้อควรรู้ รองรับเฉพาะ USDT และ USDC บนเครือข่าย ERC20 ถอนได้เฉพาะเต็มยอดไปยังกระเป๋าที่เชื่อมต่อไว้ และค่าแปลงระหว่างบาทกับสินทรัพย์ดิจิทัลคิด 1.5%
แนวโน้มผลกระทบต่อราคา: Neutral
เนื้อหานี้เป็นคู่มือการใช้งานผลิตภัณฑ์ ไม่ใช่เหตุการณ์ในตลาด จึงไม่มีผลต่อราคาคริปโตโดยตรง แต่ช่วยให้เห็นว่านักท่องเที่ยวที่ถือ Stablecoin ใช้จ่ายในไทยได้อย่างไรภายใต้กรอบทดสอบของ ก.ล.ต.
สำหรับนักท่องเที่ยวต่างชาติที่ถือครอง Stablecoin อย่าง USDT และ USDC ตอนนี้สามารถนำมาแปลงเป็นเงินบาทเพื่อสแกนจ่ายผ่าน Thai QR และบัตร Visa Prepaid ในประเทศไทยได้แล้วผ่านแอป WORPT ซึ่งเป็นบริการภายใต้กรอบ TouristDigiPay Regulatory Sandbox ด้วยความร่วมมือของ WaanX (ฝั่งสินทรัพย์ดิจิทัล) และ บริษัท ไวเพย์ จำกัด (ผู้ให้บริการ e-Money ฝั่งเงินบาท)
โดยคู่มือฉบับนี้ได้รวบรวมขั้นตอนการใช้งานอย่างละเอียด ตั้งแต่การยืนยันตัวตนด้วยหนังสือเดินทาง การโอนเหรียญ การใช้จ่าย ตลอดจนข้อจำกัดและค่าธรรมเนียมทั้งหมดไว้ในที่เดียว
WORPT ใช้ทำอะไร และต้องเตรียมอะไรก่อนเริ่ม
แนวคิดของ WORPT คือให้นักท่องเที่ยวที่ถือ Stablecoin จ่ายเงินในไทยโดยร้านค้ารับเป็นเงินบาท ผู้ใช้ฝาก USDT หรือ USDC จากกระเป๋าภายนอกเข้ามา แปลงเป็นเงินบาทใน e-Wallet แล้วสแกน Thai QR หรือใช้บัตร Visa Prepaid ของ WORPT ตามที่ระบุไว้ในหน้าคู่มือและหน้าค่าธรรมเนียม
ก่อนเริ่ม คุณต้องมีสิ่งเหล่านี้
- หนังสือเดินทางแบบมีชิป และโทรศัพท์ที่สแกนชิปได้
- อีเมลที่รับรหัส OTP 6 หลักได้
- กระเป๋าคริปโตภายนอกบนเครือข่าย Ethereum ที่ถือ USDT หรือ USDC
- กล้องสำหรับถ่ายเซลฟียืนยันใบหน้า
ลำดับการใช้งานตามคู่มือ มี 5 ช่วงหลัก ได้แก่ สมัครและยืนยันตัวตน เชื่อมต่อกระเป๋า ฝาก Stablecoin เติมเงินบาท และสแกนจ่าย ส่วนการแปลงสินทรัพย์ ถอน และเปิดใช้งานบัตรเป็นขั้นตอนเสริมตามที่ต้องการ
- สมัครบัญชีและยืนยันตัวตนด้วยหนังสือเดินทาง
- เชื่อมต่อกระเป๋าคริปโตภายนอก
- ฝาก USDT หรือ USDC เข้า WORPT
- เติมเงินบาทเข้า e-Wallet
- สแกน Thai QR เพื่อจ่ายเงิน
คู่มือทีละขั้นตอนพร้อมภาพประกอบ
1. สมัครบัญชีและยืนยันตัวตนด้วยหนังสือเดินทาง
ขั้นตอนแรกคือสร้างบัญชีและยืนยันตัวตน (KYC) ด้วยหนังสือเดินทางแบบมีชิป ต้องมีอีเมลที่รับรหัส OTP 6 หลักได้ โทรศัพท์ที่สแกนชิปในหนังสือเดินทางได้ และกล้องสำหรับถ่ายเซลฟี
ขั้นตอนที่ 1 ดาวน์โหลดแอป

ดาวน์โหลดแอป WORPT จาก App Store หรือ Google Play
ขั้นตอนที่ 2 เริ่มสมัครสมาชิก

แตะ “Join WORPT” เพื่อสร้างบัญชี
ขั้นตอนที่ 3 กรอกอีเมล

กรอกที่อยู่อีเมลของคุณ แล้วแตะ “Next”
ขั้นตอนที่ 4 ยืนยันอีเมล

ระบบส่งรหัส OTP 6 หลักไปที่อีเมล ให้นำรหัสมากรอกเพื่อยืนยันที่อยู่อีเมล
ขั้นตอนที่ 5 ตั้งรหัส PIN

ตั้งรหัส PIN สำหรับเข้าใช้บัญชี
ขั้นตอนที่ 6 สร้างบัญชีสำเร็จ

บัญชีถูกสร้างแล้ว แต่ต้องยืนยันตัวตน (KYC) ก่อนจึงจะใช้ฟีเจอร์ต่าง ๆ ได้ หน้าคู่มือระบุว่าการยืนยันตัวตนจะปลดล็อกการฝาก การจ่ายเงิน และการถอน
ขั้นตอนที่ 7 เตรียมหนังสือเดินทาง

เตรียมหนังสือเดินทางสำหรับการยืนยันตัวตน
ขั้นตอนที่ 8 สแกนหนังสือเดินทาง

วางโทรศัพท์ไว้ใกล้หนังสือเดินทางเพื่อให้แอปตรวจสอบชิป
ขั้นตอนที่ 9 ยืนยันใบหน้า

ถ่ายเซลฟีตามคำแนะนำในแอป เพื่อตรวจว่าเป็นบุคคลจริง (liveness)
ขั้นตอนที่ 10 ตรวจทานข้อมูล

ตรวจทานข้อมูลส่วนตัวและข้อมูลเพิ่มเติมของคุณ
ขั้นตอนที่ 11 รอการอนุมัติ

เมื่อได้รับอนุมัติ คุณก็ใช้งานแอป WORPT ได้
ข้อควรรู้ในขั้นตอนนี้
- หน้าคู่มือไม่ระบุระยะเวลาที่ใช้อนุมัติ และไม่ระบุวงเงินของบัญชี
- ตอนที่เปิดอ่านคู่มือ บางหน้าระบุว่าแอปบน iOS “Coming soon” ขณะที่อีกหน้ามีลิงก์ไปยัง App Store ของประเทศไทย ควรตรวจสถานะใน App Store ก่อนเดินทาง
2. เชื่อมต่อกระเป๋าคริปโตภายนอก
หลังบัญชีได้รับอนุมัติ ให้เชื่อมต่อกระเป๋าคริปโตภายนอกที่ถือ Stablecoin อยู่ ปัจจุบันรองรับเฉพาะเครือข่าย Ethereum และต้องมีอีเมลที่รับรหัส OTP ได้
ขั้นตอนที่ 1 เริ่มต้น
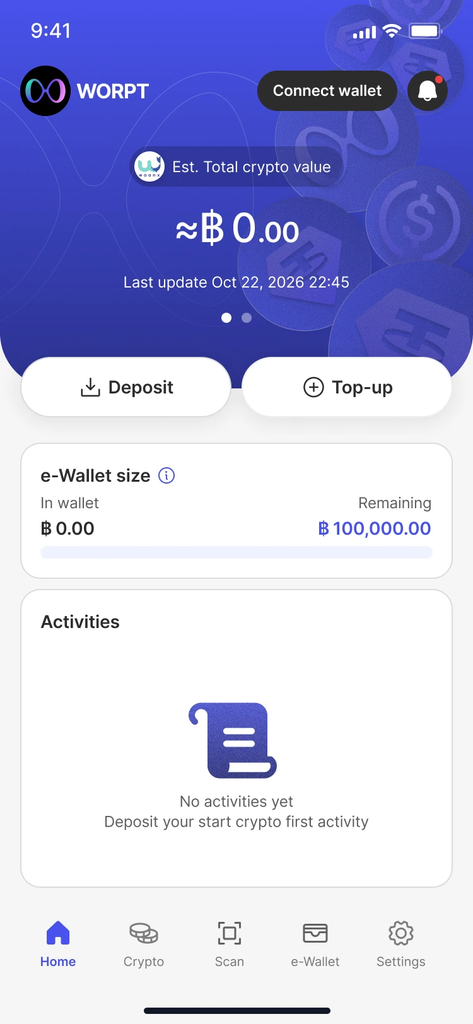
เชื่อมต่อกระเป๋าคริปโตภายนอก ขั้นตอนที่ 1 เริ่มต้น (ภาพจาก WORPT)
แตะปุ่มไอคอนเชื่อมต่อกระเป๋าที่ด้านบนของหน้าหลัก
ขั้นตอนที่ 2 เชื่อมต่อกระเป๋า

แตะปุ่ม “Connect wallet”
ขั้นตอนที่ 3 เลือกกระเป๋า

ค้นหากระเป๋าภายนอกที่คุณใช้ แล้วเลือก
ขั้นตอนที่ 4 เลือกเครือข่าย

เลือกเครือข่ายที่รองรับ ปัจจุบันรองรับเฉพาะ Ethereum
ขั้นตอนที่ 5 อนุมัติคำขอ

แอปจะพาไปยังกระเป๋าภายนอกของคุณ เพื่ออนุมัติคำขอเชื่อมต่อ
ขั้นตอนที่ 6 ยืนยันอีเมล

กรอกรหัสใช้ครั้งเดียว 6 หลักที่ส่งไปทางอีเมล เพื่อยืนยันที่อยู่อีเมล
ขั้นตอนที่ 7 เชื่อมต่อสำเร็จ

ระบบแจ้งเตือนเมื่อเชื่อมต่อกระเป๋าสำเร็จ
ขั้นตอนที่ 8 กระเป๋าพร้อมใช้งาน

กระเป๋าที่เชื่อมต่อแล้วพร้อมทำธุรกรรม
ข้อควรรู้ในขั้นตอนนี้
- คู่มือเตือนว่า มีเพียงที่อยู่กระเป๋าที่เชื่อมต่อไว้เท่านั้นที่ใช้ย้ายเงินเข้าและออกจาก WORPT ได้ จึงควรเลือกกระเป๋าที่คุณถือ Stablecoin อยู่จริง
3. ฝาก USDT หรือ USDC เข้า WORPT
ขั้นตอนนี้โอน Stablecoin จากกระเป๋าภายนอกที่เชื่อมต่อไว้เข้าบัญชี WORPT รองรับ Tether (USDT) และ USDC ตามข้อมูลเหรียญที่หน้าคู่มืออ้างถึง มีทางเข้าสองทางให้เลือกก่อนเข้าสู่ขั้นตอนเดียวกัน
ขั้นตอนที่ 1 ทางเข้าที่ 1
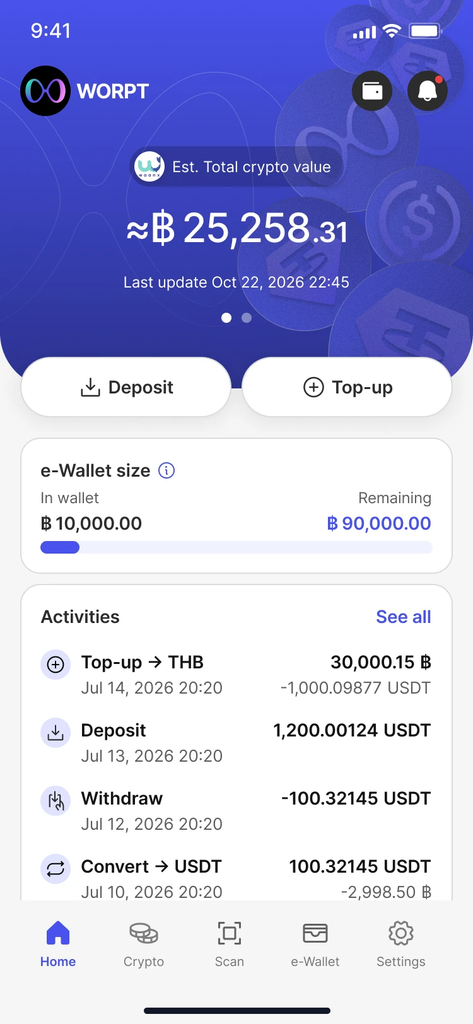
ฝาก USDT หรือ USDC เข้า WORPT ขั้นตอนที่ 1 ทางเข้าที่ 1 (ภาพจาก WORPT)
แตะ “Deposit” เพื่อเริ่มต้น
ขั้นตอนที่ 2 ทางเข้าที่ 2
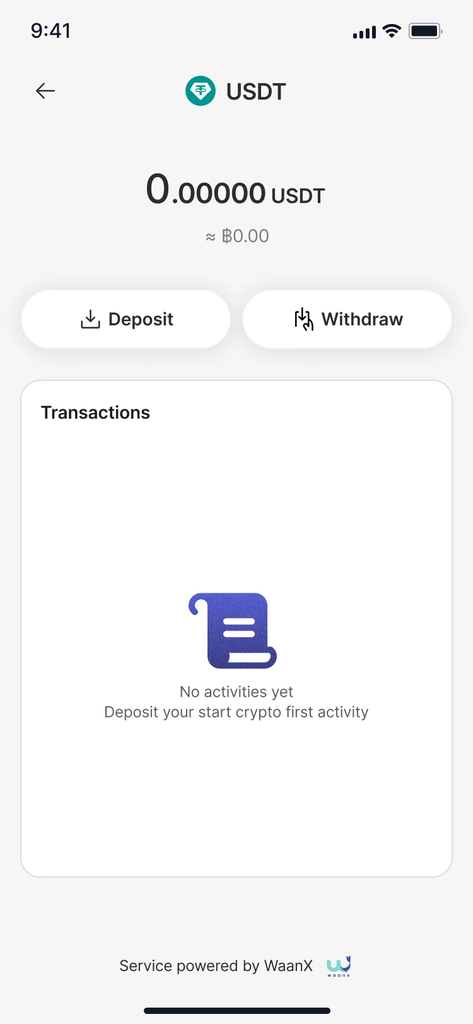
ฝาก USDT หรือ USDC เข้า WORPT ขั้นตอนที่ 2 ทางเข้าที่ 2 (ภาพจาก WORPT)
แตะ “Deposit” จากเมนูสินทรัพย์
ขั้นตอนที่ 3 ระบุจำนวนที่ฝาก
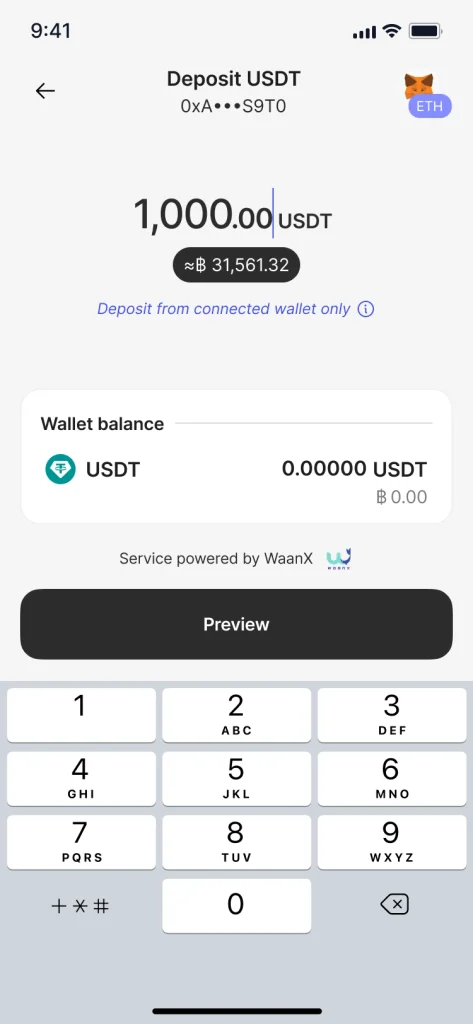
ฝาก USDT หรือ USDC เข้า WORPT ขั้นตอนที่ 3 ระบุจำนวนที่ฝาก (ภาพจาก WORPT)
กรอกจำนวนที่ต้องการฝาก
ขั้นตอนที่ 4 ตรวจสอบรายการ

ตรวจสอบข้อมูลการฝากก่อนยืนยัน
ขั้นตอนที่ 5 อนุมัติคำขอ

แอปจะพาไปยังกระเป๋าภายนอกเพื่ออนุมัติคำขอ
ขั้นตอนที่ 6 ยืนยันการฝาก

ธุรกรรมอยู่ระหว่างดำเนินการ
ขั้นตอนที่ 7 รับการแจ้งเตือน

ระบบแจ้งเตือนเมื่อการฝากเสร็จสมบูรณ์ในบัญชีของคุณ
ข้อควรรู้ในขั้นตอนนี้
- หน้าคู่มือระบุว่าเงินเข้าภายในไม่กี่วินาทีบนเครือข่ายที่รองรับ แต่หน้าค่าธรรมเนียมระบุว่าการฝากและถอนดำเนินการภายใน 48 ชั่วโมงหลังระบุที่อยู่กระเป๋า ควรเผื่อเวลาไว้ก่อนต้องใช้เงินจริง
- หน้าค่าธรรมเนียมไม่ระบุค่าฝากของ WORPT และระบุว่าค่าธรรมเนียมเครือข่ายบล็อกเชนอาจเปลี่ยนโดยไม่แจ้งล่วงหน้าเมื่อเครือข่ายคับคั่ง
4. เติมเงินบาทเข้ากระเป๋า e-Wallet
ขั้นตอนนี้คือแปลง Stablecoin ที่ฝากไว้ให้เป็นเงินบาทในกระเป๋า e-Wallet ของ WORPT เพื่อใช้จ่ายต่อ มีทางเข้าสองทาง และต้องใช้รหัส PIN ยืนยัน
ขั้นตอนที่ 1 ทางเข้าที่ 1
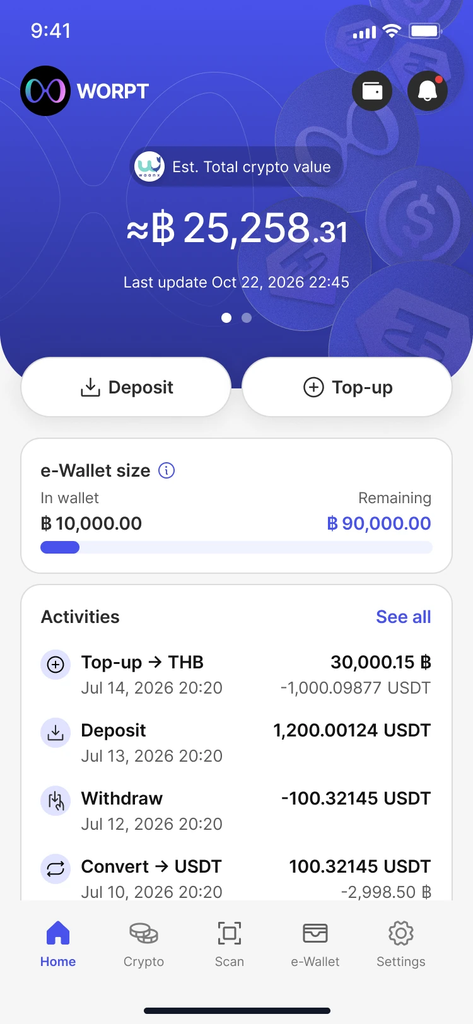
เติมเงินบาทเข้ากระเป๋า e-Wallet ขั้นตอนที่ 1 ทางเข้าที่ 1 (ภาพจาก WORPT)
แตะ “Top-up” เพื่อเริ่มต้น
ขั้นตอนที่ 2 ทางเข้าที่ 2

เปิดเมนู e-Wallet แล้วแตะ “Top-up”
ขั้นตอนที่ 3 เลือกแหล่งเงิน
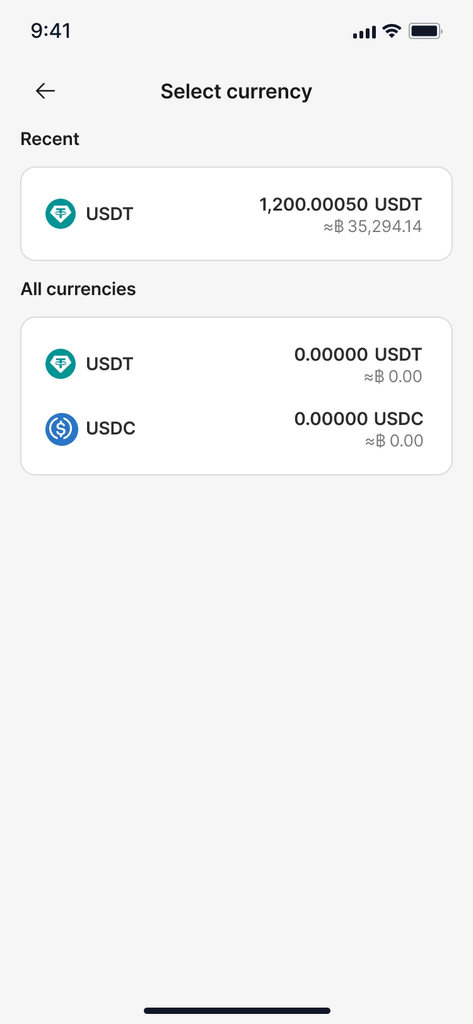
เติมเงินบาทเข้ากระเป๋า e-Wallet ขั้นตอนที่ 3 เลือกแหล่งเงิน (ภาพจาก WORPT)
เลือกแหล่งเงินที่ใช้เติม
ขั้นตอนที่ 4 ระบุจำนวนเงินบาท

กรอกจำนวนเงินที่ต้องการเติมเป็นเงินบาท
ขั้นตอนที่ 5 ยืนยัน PIN
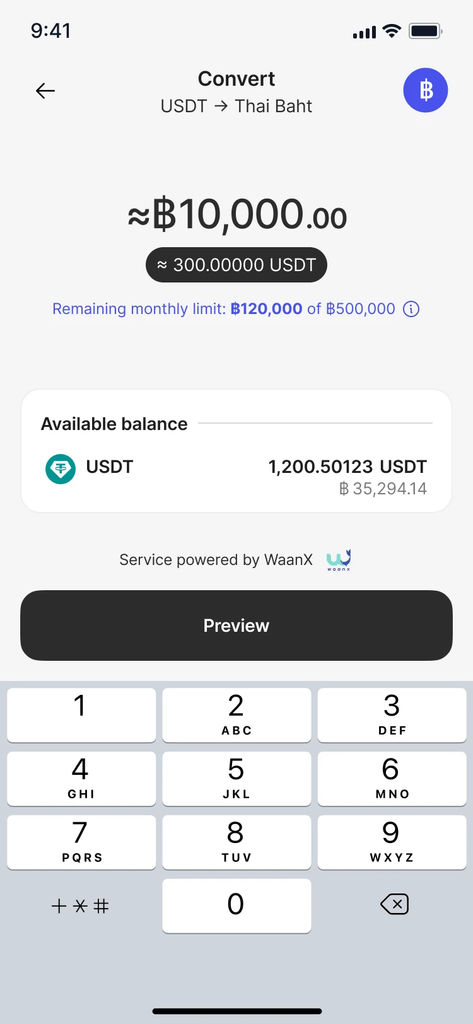
เติมเงินบาทเข้ากระเป๋า e-Wallet ขั้นตอนที่ 5 ยืนยัน PIN (ภาพจาก WORPT)
ยืนยันรหัส PIN เพื่อความปลอดภัย
ขั้นตอนที่ 6 ตรวจสอบรายการ

ตรวจสอบรายละเอียดการเติมเงินก่อนยืนยัน
ขั้นตอนที่ 7 รับการแจ้งเตือน

ระบบแจ้งเตือนเมื่อเติมเงินสำเร็จ
ข้อควรรู้ในขั้นตอนนี้
- หน้าค่าธรรมเนียมระบุว่าค่าเติมเงินฝั่ง e-Money คือ 0 บาท และการแปลงระหว่างเงินบาทกับสินทรัพย์ดิจิทัลคิด 1.5% ของสินทรัพย์ที่ลูกค้าได้รับ รวม VAT ต่อการซื้อขาย หน้าคู่มือไม่ได้บอกชัดว่าการเติมเงินด้วย Stablecoin เข้าข่ายค่าแปลง 1.5% หรือไม่ จึงควรดูยอดสุดท้ายในหน้าตรวจสอบรายการก่อนกดยืนยัน
- หน้าคู่มือและหน้าค่าธรรมเนียมที่เปิดอ่านไม่ระบุอัตราแลกเปลี่ยนและวงเงินเติมเงิน
5. จ่ายเงินด้วย Thai QR
เมื่อมีเงินบาทใน e-Wallet แล้ว ก็สแกนจ่ายที่ร้านค้าทั่วไทยได้ ร้านค้าต้องรับ Thai QR ที่ใช้ Tag29 หรือ Tag30 และต้องใส่รหัส PIN ยืนยันทุกครั้งที่จ่าย
ขั้นตอนที่ 1 เริ่มต้น

แตะ “Scan” ที่เมนูด้านล่าง
ขั้นตอนที่ 2 สแกน Thai QR

สแกนหรืออัปโหลดคิวอาร์โค้ด Thai QR (Tag29 หรือ Tag30)
ขั้นตอนที่ 3 ระบุยอดชำระ

กรอกหรือยืนยันยอดที่ต้องจ่าย
ขั้นตอนที่ 4 ตรวจสอบรายการ

ตรวจสอบข้อมูลการชำระเงิน
ขั้นตอนที่ 5 ยืนยัน PIN

ใส่รหัส PIN เพื่อยืนยันการชำระเงิน
ขั้นตอนที่ 6 ชำระเงินสำเร็จ

ดูรายละเอียดธุรกรรม และดาวน์โหลดสลิปได้จากหน้าหลักหรือเมนู e-Wallet
ข้อควรรู้ในขั้นตอนนี้
- หน้าค่าธรรมเนียมระบุว่าจ่ายด้วย QR คิด 0 บาทต่อรายการ โดยค่าธรรมเนียมปกติ 5 บาท WORPT รับภาระให้ถึงวันที่ 31 มีนาคม 2571
- หน้าคู่มือกล่าวถึงการจ่ายด้วยบัตร Visa ของ WORPT แต่ไม่มีขั้นตอนของการจ่ายด้วยบัตร
6. แปลงสินทรัพย์ดิจิทัลในแอป
เมนู Convert ใช้แปลงสินทรัพย์ภายในแอป โดยหน้าคู่มือระบุว่ารองรับการแปลงระหว่าง Stablecoin รวมถึง USDT และ USDC และใช้อัตราแบบเรียลไทม์
ขั้นตอนที่ 1 เริ่มต้น

เปิดเมนู e-Wallet แล้วแตะ “Convert”
ขั้นตอนที่ 2 เลือกสินทรัพย์ปลายทาง
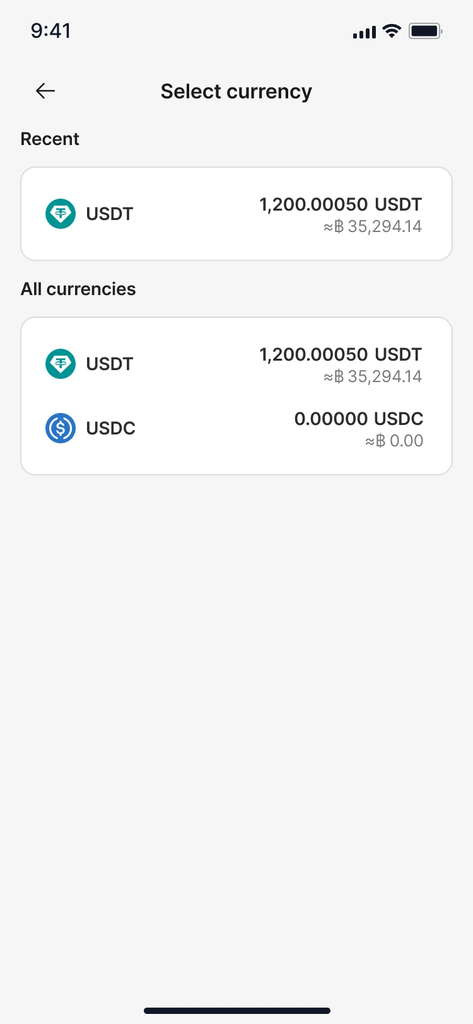
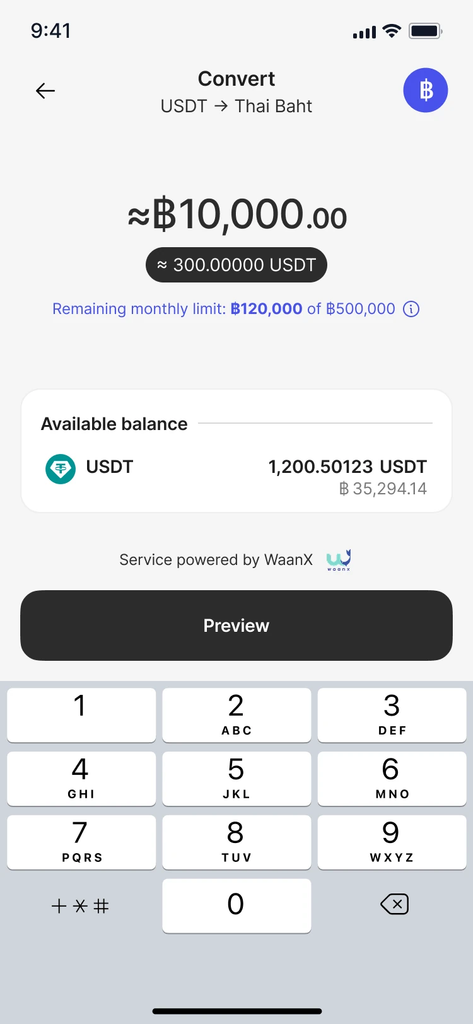
แปลงสินทรัพย์ดิจิทัลในแอป ขั้นตอนที่ 2 เลือกสินทรัพย์ปลายทาง (ภาพจาก WORPT)
เลือกสินทรัพย์ที่ต้องการแปลงไป
ขั้นตอนที่ 3 ยืนยันจำนวน
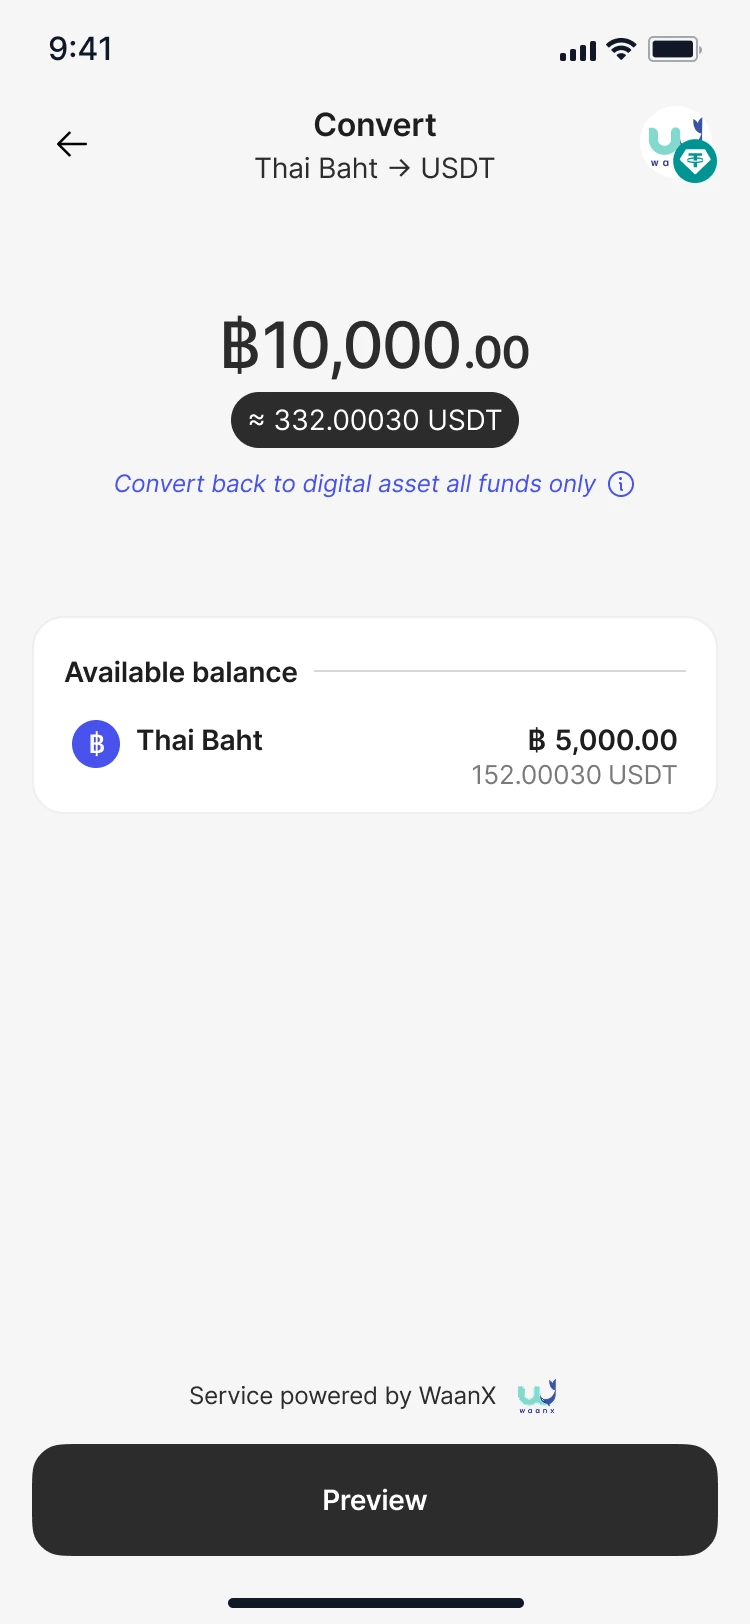
แปลงสินทรัพย์ดิจิทัลในแอป ขั้นตอนที่ 3 ยืนยันจำนวน (ภาพจาก WORPT)
กรอกหรือยืนยันจำนวนที่ต้องการแปลง
ขั้นตอนที่ 4 ยืนยัน PIN

ใส่รหัส PIN เพื่อยืนยันธุรกรรม
ขั้นตอนที่ 5 ตรวจสอบรายการ

ตรวจสอบรายละเอียดการแปลงแล้วยืนยัน
ขั้นตอนที่ 6 แปลงสำเร็จ

ดูรายละเอียดธุรกรรม และดาวน์โหลดสลิปได้จากหน้าหลักหรือเมนู e-Wallet
ข้อควรรู้ในขั้นตอนนี้
- หน้าคู่มือระบุว่า “ไม่มีค่าธรรมเนียมแอบแฝง” แต่ไม่ได้ให้ตัวเลขค่าธรรมเนียมหรืออัตราแลกเปลี่ยน และหน้าค่าธรรมเนียมไม่ได้ระบุค่าแปลงระหว่าง Stablecoin ด้วยกัน
7. ถอนสินทรัพย์ดิจิทัลกลับกระเป๋าภายนอก
ถ้ายังเหลือ Stablecoin ก่อนกลับบ้าน ถอนกลับกระเป๋าที่เชื่อมต่อไว้ได้ แต่คู่มือระบุว่ารองรับการถอนแบบเต็มยอดคงเหลือเท่านั้น และต้องยืนยันทั้งรหัส PIN และรหัส OTP ทางอีเมล
ขั้นตอนที่ 1 เริ่มต้น

ที่หน้า Crypto เลือกสินทรัพย์ดิจิทัลที่ต้องการถอน
ขั้นตอนที่ 2 แตะถอน

ที่หน้ารายละเอียดสินทรัพย์ แตะ “Withdraw”
ขั้นตอนที่ 3 ยืนยันจำนวน

ระบบแสดงยอดคงเหลือทั้งหมด รองรับการถอนเต็มยอดเท่านั้น
ขั้นตอนที่ 4 ตรวจสอบรายการ

ตรวจสอบรายละเอียดการถอน แล้วแตะ “Confirm” เพื่อไปขั้นตอนยืนยันตัวตน
ขั้นตอนที่ 5 ยืนยัน PIN

ใส่รหัส PIN
ขั้นตอนที่ 6 ยืนยันอีเมล

กรอกรหัส OTP 6 หลักที่ส่งไปทางอีเมล
ขั้นตอนที่ 7 เริ่มการถอนแล้ว

ดูรายละเอียดธุรกรรม และดาวน์โหลดสลิปได้จากหน้าหลักหรือเมนู Crypto
ข้อควรรู้ในขั้นตอนนี้
- หน้าค่าธรรมเนียมระบุค่าถอน 1 USDT หรือ 1 USDC (ERC20) ต่อรายการ และระบุว่าการฝากและถอนดำเนินการภายใน 48 ชั่วโมง
- ตามคำเตือนในหน้าเชื่อมต่อกระเป๋า การย้ายเงินออกใช้ได้เฉพาะที่อยู่กระเป๋าที่เชื่อมต่อไว้
8. เปิดใช้งานบัตร WORPT Visa Prepaid
ถ้าสั่งบัตร WORPT Visa Prepaid ไว้ ต้องเปิดใช้งานในแอปก่อนใช้ ใช้ QR หรือรหัสเปิดใช้งานที่มากับบัตร และต้องเติมเงินบาทก่อนจึงจะใช้จ่ายได้
ขั้นตอนที่ 1 เริ่มต้น

ไปที่ “e-Wallet” แล้วแตะ “WORPT cards”
ขั้นตอนที่ 2 เปิดใช้งานบัตร

แตะ “Activate card”
ขั้นตอนที่ 3 สแกนรหัสเปิดใช้งาน

สแกนคิวอาร์โค้ดที่มาพร้อมบัตร
ขั้นตอนที่ 4 กรอกรหัสเปิดใช้งาน

หรือกรอกรหัสเปิดใช้งานเอง แล้วแตะ “Activate”
ขั้นตอนที่ 5 ตรวจทานข้อมูล

ตรวจสอบข้อมูล ติ๊กช่องยอมรับ แล้วแตะ “Confirm”
ขั้นตอนที่ 6 ยืนยัน PIN

ยืนยันด้วยรหัส PIN
ขั้นตอนที่ 7 เปิดใช้งานบัตรสำเร็จ

แอปแจ้งว่าบัตรพร้อมใช้ ให้เติมเงินเพื่อเริ่มใช้จ่ายเป็นเงินบาท
ขั้นตอนที่ 8 จัดการบัตร

เปิดหรือปิดบัตร เปิดธุรกรรมออนไลน์ และดูข้อมูลบัตรได้
ข้อควรรู้ในขั้นตอนนี้
- หน้าค่าธรรมเนียมระบุค่าออกบัตร Visa เสมือน 800 บาทต่อใบ และบัตรจริง 1,200 บาทต่อใบ จ่ายด้วยบัตร WORPT Visa ไม่มีค่าธรรมเนียม แต่ซื้อสินค้าด้วยสกุลเงินอื่นที่ไม่ใช่เงินบาทคิด 3.5% ต่อรายการ
- หน้าคู่มือไม่ระบุขั้นตอนการสั่งซื้อบัตร และอ้างถึงข้อกำหนดและเงื่อนไขของบัตรที่หน้า worpt.com/card-terms ซึ่งบทความนี้ยังไม่ได้เปิดอ่าน
สรุปค่าธรรมเนียมที่ WORPT เปิดเผย
ตารางนี้สรุปจากหน้าค่าธรรมเนียม worpt.com/fee ซึ่งแยกเป็นฝั่ง e-Money (ไวเพย์) และฝั่งสินทรัพย์ดิจิทัล (WaanX) รองรับเฉพาะ USDT และ USDC บนเครือข่าย ERC20
| รายการ | ค่าธรรมเนียม |
|---|---|
| ค่าเปิดบัญชี e-Money | 0 บาท |
| ค่าเติมเงิน e-Money | 0 บาท |
| ค่าออกบัตร Visa เสมือน | 800 บาทต่อใบ |
| ค่าออกบัตร Visa จริง | 1,200 บาทต่อใบ |
| จ่ายด้วย QR | 0 บาทต่อรายการ (ค่าปกติ 5 บาท WORPT รับภาระถึง 31 มีนาคม 2571) |
| จ่ายด้วยบัตร WORPT Visa | 0 บาท |
| ซื้อสินค้าด้วยสกุลเงินอื่นที่ไม่ใช่บาท | 3.5% ต่อรายการ |
| แปลงระหว่างเงินบาทกับสินทรัพย์ดิจิทัล | 1.5% ของสินทรัพย์ที่ลูกค้าได้รับ รวม VAT ต่อการซื้อขาย |
| ถอนสินทรัพย์ดิจิทัล | 1 USDT หรือ 1 USDC (ERC20) |
| ค่ารักษาบัญชี e-Money | 50 บาทต่อเดือน ยกเว้นขณะยังใช้งาน เก็บเมื่อไม่เปิดแอปหรือไม่ใช้บัตรเกิน 3 เดือนติดต่อกัน |
| ค่ารักษาบัญชีสินทรัพย์ดิจิทัล | มูลค่าไม่เกิน 10 ดอลลาร์สหรัฐต่อเดือน หลังไม่ใช้งานเกิน 3 เดือนติดต่อกัน |
| ปิดบัญชี | 0 บาท |
หน้าค่าธรรมเนียมไม่ระบุอัตราแลกเปลี่ยนหรือส่วนต่าง และไม่ระบุวงเงินต่อรายการ ต่อวัน หรือต่อเดือน
ข้อควรระวังก่อนใช้งานจริง
- รองรับเฉพาะ USDT และ USDC บนเครือข่าย ERC20 และเชื่อมต่อกระเป๋าบน Ethereum เท่านั้น
- ถอนได้เฉพาะเต็มยอดคงเหลือ และถอนออกไปยังกระเป๋าที่เชื่อมต่อไว้เท่านั้น
- การฝากและถอนอาจใช้เวลาถึง 48 ชั่วโมงตามหน้าค่าธรรมเนียม แม้หน้าคู่มือฝากระบุว่าเงินเข้าภายในไม่กี่วินาที
- บัญชีที่ไม่มีการเปิดแอปหรือใช้บัตรเกิน 3 เดือนติดต่อกันอาจถูกเก็บค่ารักษาบัญชี
- WORPT ทำงานภายใต้กรอบทดสอบ Sandbox และมีเอกสารเปิดเผยความเสี่ยงเรื่องการดูแลสินทรัพย์ ควรอ่านเงื่อนไข ค่าธรรมเนียม และความเสี่ยงก่อนใช้งาน
ส่วนตัวผู้เขียนมองว่าจุดที่ช่วยนักท่องเที่ยวมากที่สุดคือร้านค้าได้รับเป็นเงินบาท ผู้ใช้จึงไม่ต้องหาที่ที่รับคริปโต และการสแกน Thai QR ก็คุ้นมือคนไทยอยู่แล้ว แต่ต้องย้ำว่าคู่มือนี้เรียบเรียงจากหน้าทางการ ไม่ใช่ผลการทดลองใช้เอง จึงยังไม่รู้ว่าอัตราแลกเปลี่ยนจริง เวลาอนุมัติ KYC และวงเงินเป็นอย่างไร สิ่งที่ควรทำคือลองด้วยจำนวนน้อยก่อน ดูยอดสุดท้ายในหน้าตรวจสอบรายการทุกครั้ง และเผื่อเวลาสำหรับการฝากถอน ส่วนค่าเครือข่ายฝั่งกระเป๋าภายนอกที่ใช้โอนเข้ามาก็อาจมีเพิ่มต่างหาก สิ่งที่ควรจับตาต่อคือสถานะแอปบน iOS และผลของโครงการ Sandbox
ที่มา: Onboarding, Connect Wallet, Deposit, Topup, Spend, Convert, Withdraw, Activate Card, Fee & rates | เครดิตภาพจาก WORPT
English version, WORPT tourist guide from crypto to Thai baht
WORPT is a wallet app for foreign tourists. You deposit stablecoins such as USDT or USDC, convert them to Thai baht, and pay with Thai QR or a Visa Prepaid card, according to WORPT. It operates under the TouristDigiPay Regulatory Sandbox. The baht side (e-Money) is provided by WiPay and the digital asset side by WaanX. This guide is compiled from WORPT’s eight official guide pages and its fee page, which we opened on 16 November 2026. We have not tested the app ourselves, and every screenshot comes from WORPT’s own guides.
What you need before you start
- A passport with a chip, and a phone that can scan the chip
- An email address that can receive a 6-digit OTP
- An external crypto wallet on the Ethereum network that holds USDT or USDC
- A camera for the liveness selfie
The guides follow five main stages: sign up and verify, connect a wallet, deposit stablecoins, top up in baht, and scan to pay. Converting assets, withdrawing and activating a card are optional extras.
- Sign up and verify your identity with your passport
- Connect your external crypto wallet
- Deposit USDT or USDC into WORPT
- Top up your e-Wallet in Thai baht
- Scan a Thai QR code to pay
Step by step guide with screenshots
1. Sign up and verify your identity with your passport
The first step is to create an account and complete identity verification (KYC) with a chip passport. You need an email address that can receive a 6-digit OTP, a phone that can scan the passport chip, and a camera for the liveness selfie.
Step 1, Download the app
Download the WORPT app from the App Store or Google Play.
Step 2, Join WORPT
Tap “Join WORPT” to create an account.
Step 3, Enter your email
Enter your email address and tap “Next”.
Step 4, Confirm your email
A 6-digit OTP is sent to your inbox. Enter it to confirm your email address.
Step 5, Create a PIN
Create a PIN, which you use to access your account.
Step 6, Account created
Your account is created, but you may need KYC to access features. The guide says identity verification unlocks deposit, spend and withdraw.
Step 7, Prepare your passport
Have your passport ready for identity verification.
Step 8, Scan your passport
Hold your phone near your passport so the app can verify the chip.
Step 9, Face verification
Take a liveness selfie by following the guideline.
Step 10, Review your information
Review your personal and additional information.
Step 11, Get approved
Once approved, you can use the WORPT app.
Good to know
- The guide page does not state how long approval takes or what limits apply to the account.
- When we opened the guides, some pages said the iOS app was “Coming soon”, while another page linked to the Thai App Store listing. Check the App Store status before you travel.
2. Connect your external crypto wallet
Once your account is approved, connect the external crypto wallet that holds your stablecoins. Only the Ethereum network is supported at the moment, and you need an inbox that can receive a 6-digit OTP.
Step 1, Get started
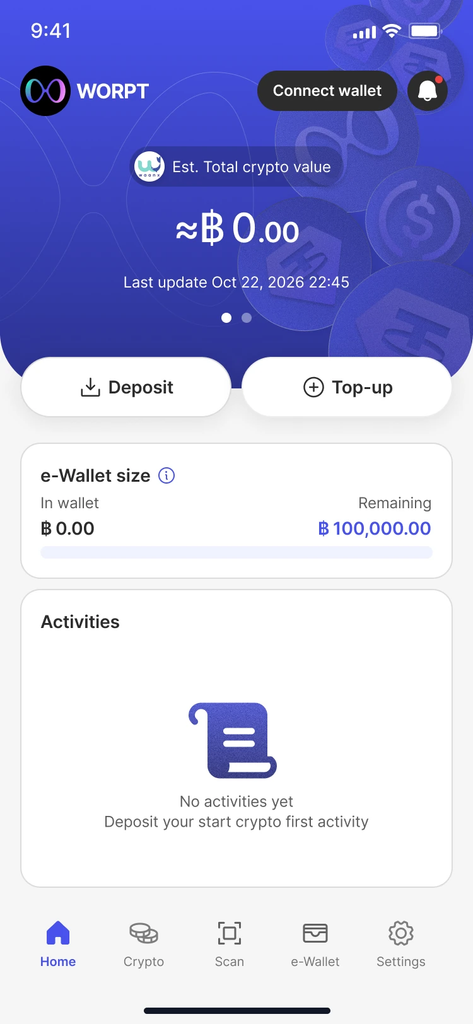
Connect your external crypto wallet, step 1 Get started (Image from WORPT)
Tap the connect wallet icon button at the top of the home screen.
Step 2, Connect wallet
Tap the “Connect wallet” button.
Step 3, Select wallet
Search for your external wallet and select it.
Step 4, Select network
Select the supported network. Currently, only the Ethereum network is supported.
Step 5, Sign request
You are redirected to your external wallet app to approve the connection request.
Step 6, Email confirmation
Enter the 6-digit one-time code sent to your email to confirm your address.
Step 7, Connected
You receive a notification when the wallet connects successfully.
Step 8, Your wallet is ready
The wallet is connected and ready for transactions.
Good to know
- The guide warns that only your connected wallet address can be used to move funds in and out of WORPT, so choose the wallet that actually holds your stablecoins.
3. Deposit USDT or USDC into WORPT
This step transfers stablecoins from your connected external wallet into your WORPT account. The guide’s coin information covers Tether (USDT) and USDC. There are two ways in, and both lead to the same steps.
Step 1, Entry 1
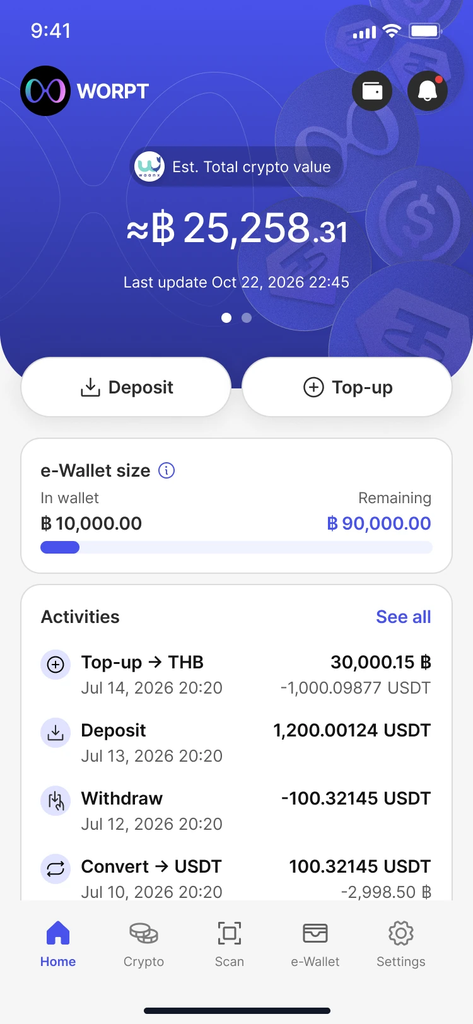
Deposit USDT or USDC into WORPT, step 1 Entry 1 (Image from WORPT)
Tap “Deposit” to get started.
Step 2, Entry 2
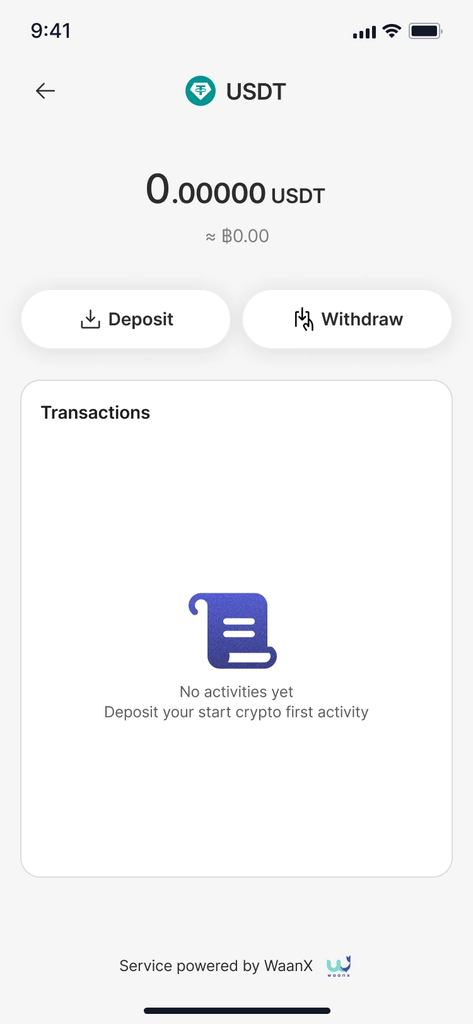
Deposit USDT or USDC into WORPT, step 2 Entry 2 (Image from WORPT)
Tap “Deposit” from your asset menu.
Step 3, Deposit information
Deposit USDT or USDC into WORPT, step 3 Deposit information (Image from WORPT)
Enter the deposit amount.
Step 4, Preview
Preview your deposit information.
Step 5, Sign request
You are redirected to your external wallet app to approve the request.
Step 6, Deposit confirmation
The transaction is in progress.
Step 7, Get notified
You are notified when the deposit is settled in your account.
Good to know
- The deposit guide says funds arrive within seconds on supported networks, but the fee page says deposits and withdrawals are processed within 48 hours after the wallet address is specified. Allow extra time before you need the money.
- The fee page lists no WORPT deposit fee, and notes that blockchain network fees can change without notice when the network is congested.
4. Top up your e-Wallet in Thai baht
This step turns the stablecoins you deposited into Thai baht in your WORPT e-Wallet so you can spend them. There are two ways in, and you confirm with your PIN.
Step 1, Entry 1
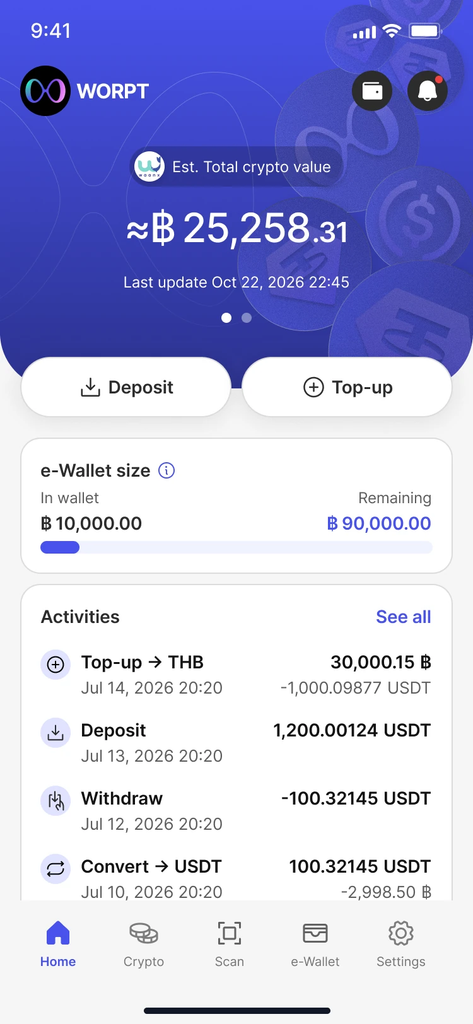
Top up your e-Wallet in Thai baht, step 1 Entry 1 (Image from WORPT)
Tap “Top-up” to get started.
Step 2, Entry 2
Open the e-wallet menu and tap “Top-up”.
Step 3, Select top-up source
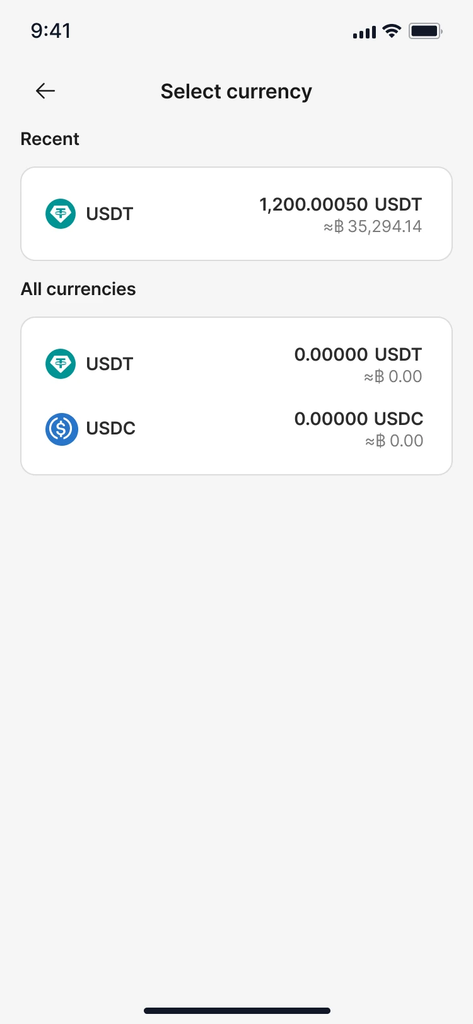
Top up your e-Wallet in Thai baht, step 3 Select top-up source (Image from WORPT)
Select the source of funds.
Step 4, Top-up information
Enter the top-up amount in Thai baht.
Step 5, PIN confirmation
Confirm your PIN for security.
Step 6, Preview
Confirm the top-up details.
Step 7, Get notified
You are notified when the top-up succeeds.
Good to know
- The fee page lists a 0 baht e-Money top-up fee and a 1.5% fee, including VAT, on the assets the customer receives per trade when converting between THB and digital assets. The guide does not say clearly whether a top-up funded by stablecoins falls under that 1.5%, so check the final amount on the preview screen before you confirm.
- Neither the guide nor the fee page we opened states the exchange rate or top-up limits.
5. Pay with Thai QR
With baht in your e-Wallet, you can scan to pay at merchants across Thailand. The merchant must accept Thai QR payments that use Tag29 or Tag30, and you enter your PIN to confirm each payment.
Step 1, Get started
Tap “Scan” in the bottom menu.
Step 2, Scan Thai QR payment
Scan or upload a Thai QR payment (Tag29 or Tag30).
Step 3, Payment amount
Input or confirm the payment amount.
Step 4, Preview
Review the payment information.
Step 5, PIN confirmation
Enter your PIN to confirm the payment.
Step 6, Payment successful
View the transaction details. You can download the payment slip from the home screen or the e-wallet menu.
Good to know
- The fee page lists QR payments at 0 baht per transaction. The regular 5 baht fee is covered by WORPT through 31 March 2028 (B.E. 2571).
- The spend guide mentions paying with the WORPT Visa card but gives no steps for card payments.
6. Convert assets inside the app
The Convert menu changes one asset into another inside the app. The guide says it supports conversion between stablecoins, including USDT and USDC, at real-time rates.
Step 1, Get started
Open the e-Wallet menu and tap “Convert”.
Step 2, Select destination asset
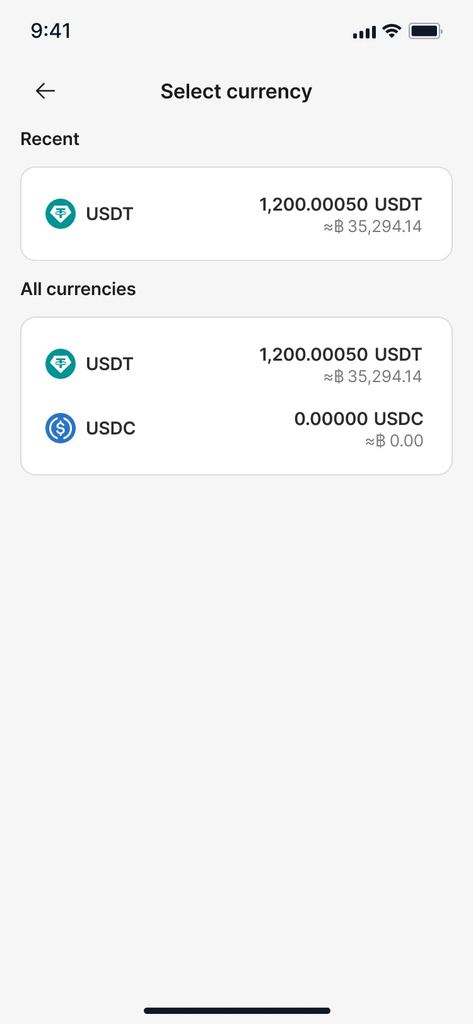
Convert assets inside the app, step 2 Select destination asset (Image from WORPT)
Choose the asset you want to convert to.
Step 3, Confirm amount
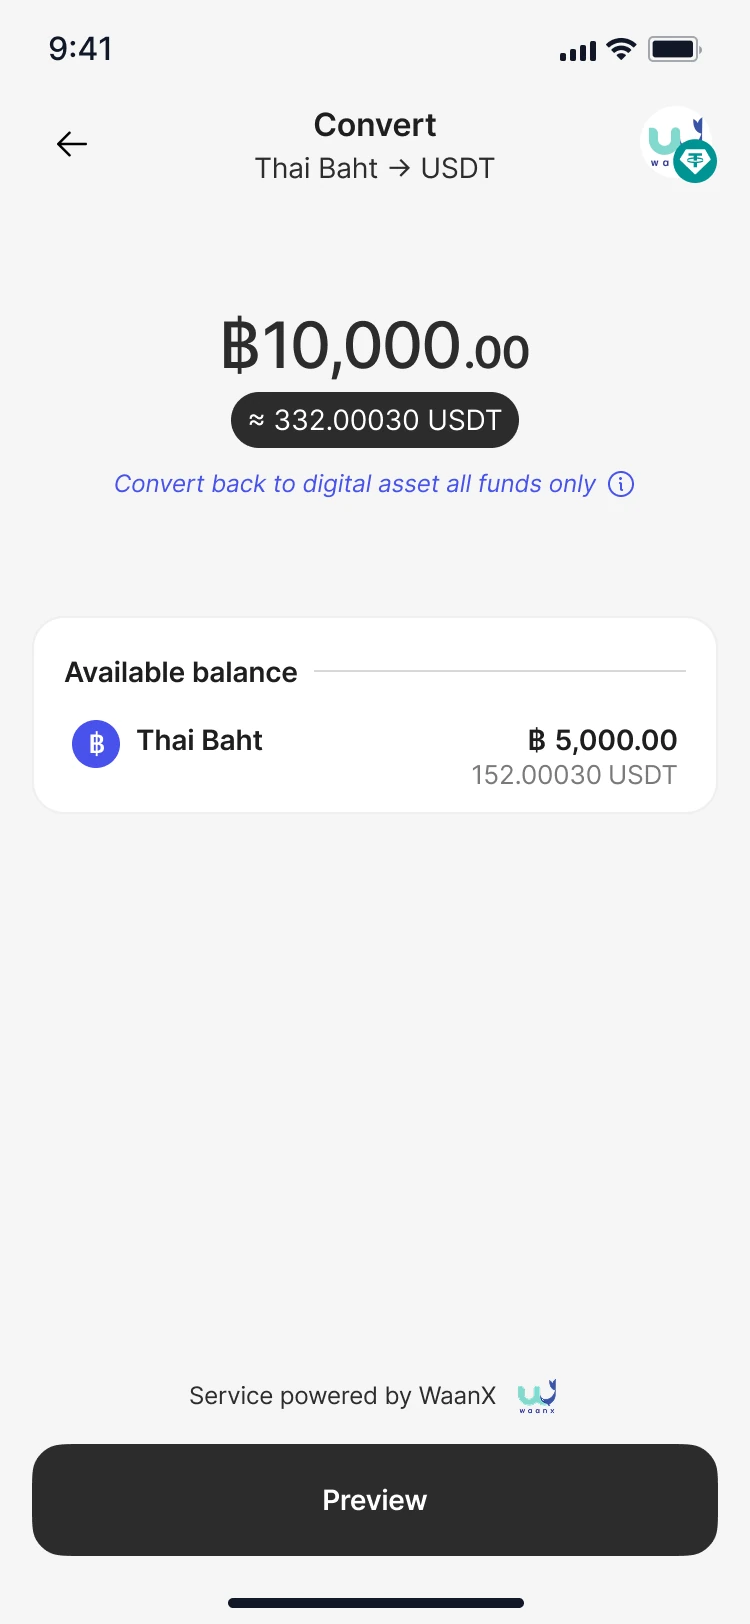
Convert assets inside the app, step 3 Confirm amount (Image from WORPT)
Enter or confirm the amount to convert.
Step 4, PIN confirmation
Enter your PIN to confirm the transaction.
Step 5, Preview
Review the conversion details and confirm.
Step 6, Convert successful
View the transaction details. You can download the payment slip from the home screen or the e-wallet menu.
Good to know
- The guide says there are no hidden fees, but it gives no fee amounts or exchange rates, and the fee page does not list a fee for conversion between stablecoins.
7. Withdraw digital assets back to your wallet
If you still have stablecoins left before you head home, you can withdraw them to your connected wallet. The guide says only full-balance withdrawals are supported, and you confirm with both your PIN and an email OTP.
Step 1, Get started
From the Crypto page, select the digital asset you want to withdraw.
Step 2, Withdraw
On the Asset Detail page, tap “Withdraw”.
Step 3, Confirm amount
The system shows the full available balance. Withdraw supports full-balance withdrawal only.
Step 4, Preview
Review the withdrawal details, then tap “Confirm” to proceed to verification.
Step 5, PIN confirmation
Enter your PIN.
Step 6, Email confirmation
Enter the 6-digit OTP sent to your inbox.
Step 7, Withdraw initiated
View the transaction details and download the slip from the home screen or the Crypto menu.
Good to know
- The fee page lists a withdrawal fee of 1 USDT or 1 USDC (ERC20) and says deposits and withdrawals are processed within 48 hours.
- Per the warning on the connect wallet page, funds can only move out to the wallet address you connected.
8. Activate your WORPT Visa Prepaid card
If you have a WORPT Visa Prepaid card, activate it in the app before use. You need the QR code or activation code that came with the card, and you must top up in baht before you can spend.
Step 1, Get started
Go to “e-Wallet” and tap “WORPT cards”.
Step 2, Activate card
Tap “Activate card”.
Step 3, Scan activation code
Scan the QR code that came with your card.
Step 4, Activation code
Or enter the activation code manually, then tap “Activate”.
Step 5, Review your information
Check your information, tick the box and tap “Confirm”.
Step 6, PIN confirmation
Confirm your PIN.
Step 7, Card activated
The app says your card is ready. Top up to start spending in Thai baht.
Step 8, Manage your card
Enable or disable the card, turn on online transactions, and view card information.
Good to know
- The fee page lists 800 baht per virtual Visa card and 1,200 baht per physical Visa card. Payments with a WORPT Visa card cost 0 baht, but purchases in a currency other than baht cost 3.5% per transaction.
- The guide does not cover how to order a card, and it points to card terms at worpt.com/card-terms, which we did not open.
Fee summary published by WORPT
This table summarises the fee page at worpt.com/fee, which separates e-Money (WiPay) from digital assets (WaanX). Only USDT and USDC on ERC20 are supported.
| Item | Fee |
|---|---|
| e-Money account opening | 0 baht |
| e-Money top-up | 0 baht |
| Visa virtual card issuance | 800 baht per card |
| Visa physical card issuance | 1,200 baht per card |
| QR code payment | 0 baht per transaction (the regular 5 baht fee is covered by WORPT through 31 March 2028) |
| Payment with a WORPT Visa card | 0 baht |
| Card purchases in a currency other than baht | 3.5% per transaction |
| Conversion between baht and digital assets | 1.5% of the assets the customer receives, including VAT, per trade |
| Digital asset withdrawal | 1 USDT or 1 USDC (ERC20) |
| e-Money account maintenance | 50 baht per month, waived while the account is in use. Applies after more than 3 consecutive months with no app access or card activity |
| Digital asset account maintenance | Assets worth up to USD 10 per month, after more than 3 consecutive months without app or card activity |
| Account closure | 0 baht |
The fee page does not state exchange rates or spreads, and it does not state per-transaction, daily or monthly limits.
Before you use it for real
- Only USDT and USDC on ERC20 are supported, and wallets connect on Ethereum only.
- Withdrawals are full-balance only, and only to the wallet you connected.
- Deposits and withdrawals can take up to 48 hours per the fee page, even though the deposit guide says funds arrive within seconds.
- Accounts with no app access or card activity for more than 3 consecutive months may be charged maintenance fees.
- WORPT operates inside a regulatory sandbox and links a risk disclosure on asset custody. Read the conditions, fees and risks before you use it.
Our take: the most useful part for tourists is that merchants receive baht, so you do not need to find a shop that accepts crypto, and scanning a Thai QR code is how locals pay anyway. But this guide is based on the official pages, not our own test, so we cannot yet say what the real exchange rate, KYC approval time and limits look like. Start with a small amount, check the final figure on the preview screen every time, and allow extra time for deposits and withdrawals. The network fee charged by your external wallet for the transfer in may come on top. Worth watching next is the iOS app status and how the sandbox project develops.
Sources: Onboarding, Connect Wallet, Deposit, Topup, Spend, Convert, Withdraw, Activate Card, Fee & rates | Images from WORPT